Adobe Premiere Pro Intro Tutorials:
Watch the following videos and take notes as you watch. (Sketch out the User Interface of Adobe Premiere so you can best understand where things are located.)
Intro to Editing in Adobe Premiere Pro: Intro to Title Design in Premiere Pro: Intro to Transitions in Premiere Pro:
|
|
|
|
Adobe Premiere Pro Resources:
*The following are all created by Adobe and can be used to answer your questions in regards to specific actions in Adobe Premiere Pro while working on your tutorials and projects.
|
|
| ||||||||||||||||||||||||
Jazz Video Project:
USE THE NEW TUTORIAL VIDEO LOCATED IN THE SHARED DRIVE ON YOUR COMPUTER!

"If a picture is worth a thousand words, then a video must be worth a million."
In this project, you will use Premier Pro to create a visual documentary on Jazz Music. Located in this Project Folder is a music file and 20 images related to jazz. Open the folder and download all of the required files to complete this project. Save them in a location where they're easy to find. Open up Premier Pro and import all of the downloaded files. Listen to the audio and place the images on the timeline, matching the beat of the jazz music exactly. A new image should appear on every beat. Use your markers and other helpful aids in Premier Pro to get this done efficiently and correctly! Next, add position and scale animation to add interest and emphasis to certain parts of the images. Make sure each and every image scales in or out and moves in a direction. Create a title for your project and place it at the beginning of the video. Finally, add opacity animation to make the beginning and end of the video only to fade in and out. MAKE SURE YOU SAVE OFTEN! Use the rubric located below to make sure you have completed all of the project requirements. Once you are satisfied with your project, save it as a Premier Pro Project File (.prproj) and name it as lastname + firstname +jazz. Export the video file and save it in QuickTime format. Name it the same as the project file. Once done, turn into our Dropbox. |
| ||||||||||||
Music Video Project:

You have been hired as a video editor by Stories through Images, Inc. They want you to tell a story through video editing, using still images and a music track. The images should change on the lyrics in the song and have some type of Video Transition/Effect applied to each to create movement.
Select a music track of your own, that is school appropriate, and take notice of the lyrics of what is said in the song. You will only use 30-45 seconds of the song. You are going to tell a story through moving images based on what is being said in the song. A new image will appear with the different things being said in the song. Go on-line and find images that relate to your song to tell the story. Add a title a the beginning to introduce the video or add some titles throughout the video. Editing video to the beat of music or to words is a basic skill that is used in all levels of video production. Remember to alternate video transitions/effects with each image. Remember to fade up your first image from black and fade out you last image to black. As you work, save your project as a Premiere Project file (.PRPROJ) and name it last name +first initial + story. Export the media using the H.264 encoder with the same name (ex: pettywstory.MP4). Submit the exported file thru Google Drive and share with Goble ([email protected]). Don't forget to review the rubric to make sure you are meeting all of the project requirements! |
LOOK AND READ THESE BEFORE YOUR BEGIN:
AFTER YOU"VE READ THE ABOVE DOCUMENTS, YOU MAY START WITH EVERYTHING BELOW:
| ||||||||
Birthday 500 Video Project:
|
In this project you will be editing audio and video to put the sequences in their proper order, that that the video makes sense. Create a folder on your Desktop and name it BIRTHDAY500. Save all of the files to the right to your newly created folder. Import all of the video clips and the audio clip into a New Premiere Project. Before editing anything, watch all of the videos to get an idea of what you can use and where it will go. Every clip MUST be used in some way and you may cut clips in any way you find necessary and even reuse multiple clips. Make it fun and be creative!
https://www.easy-youtube-mp3.com/ |
LOOK AND READ THESE BEFORE YOUR BEGIN:
-CREATE A NEW FOLDER (Your Name + DM1) IN THE WINDOWS C: DRIVE
-GO TO SHARED>PUBLIC>CTE>DIGITAL MEDIA 1 & COPY BIRTHDAY 500 FOLDER & PASTE TO YOUR NEWLY CREATED FOLDER ON THE WINDOWS C: DRIVE | ||||
video Portrait Project:
|
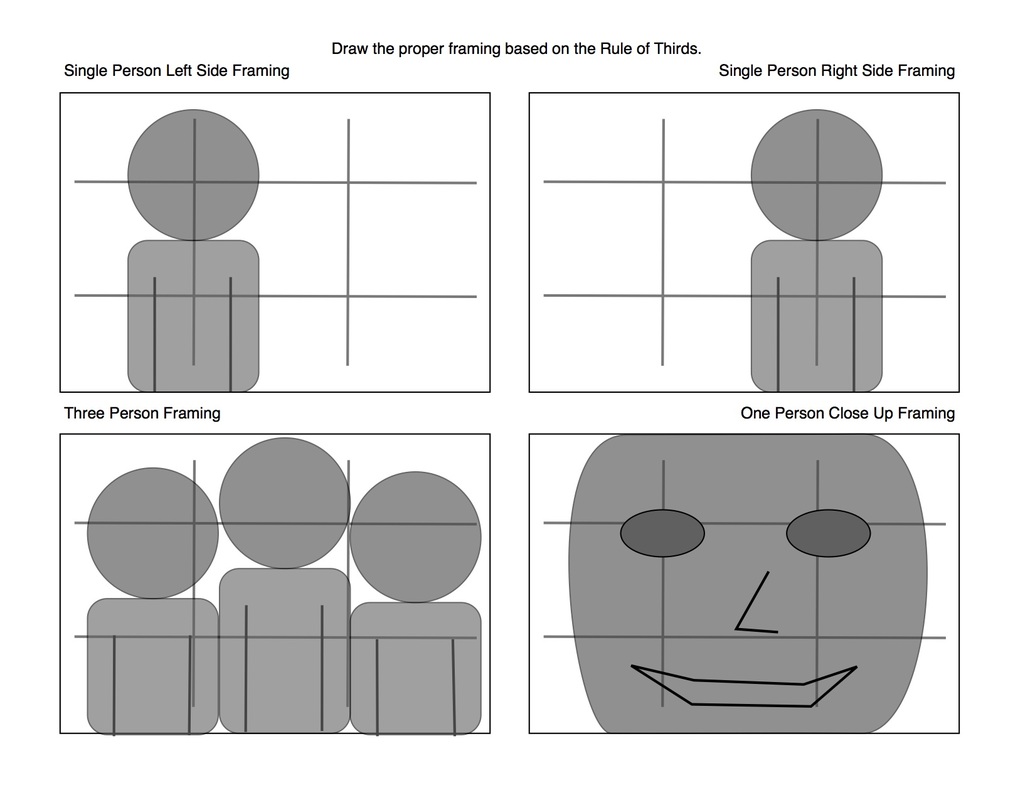
A stylistic way to show someone's personality is through capturing video portraits. Use proper medium to close-up shot camera framing, along with alternating left and right rule of thirds composition. Review these techniques from the files on the right. In this project, you will learn about planning and utilizing a certain type of shot. You will be using the on-board camera of a mobile device.(Make sure to shoot with your device in the horizontal NOT vertical position!)
After the class has gone over the shot compositions, decide which people will be included in your portrait montage (can be classmates or other students in the school). You need 7-9 people in your video. You must storyboard your shots before shooting to make sure the people alternate who is on left and who is on right each time when you edit. Record 30 seconds of each person even tho you may only end up using 10-15 seconds of the shot in post. Using the on-board camera of a mobile device, record each person for the video (be creative with the background areas), import the files to your computer, edit together in Adobe Premiere, add a school appropriate music track that fits your target audience (audio should fade in/out) add titles to balance the spacing. Titles must include name (larger font), hobbies and hometown (smaller font) for each person. Must have an ending title with your personal information. The final edited video should be around two minutes. After you have finished your project, save it as the last name + first initial + vidport. Export the media with the same name (ex: pettyvidport.MP4). Submit the exported video to the teacher. Don't forget to review the rubric to make sure you are meeting all of the project requirements. |
| ||||||||
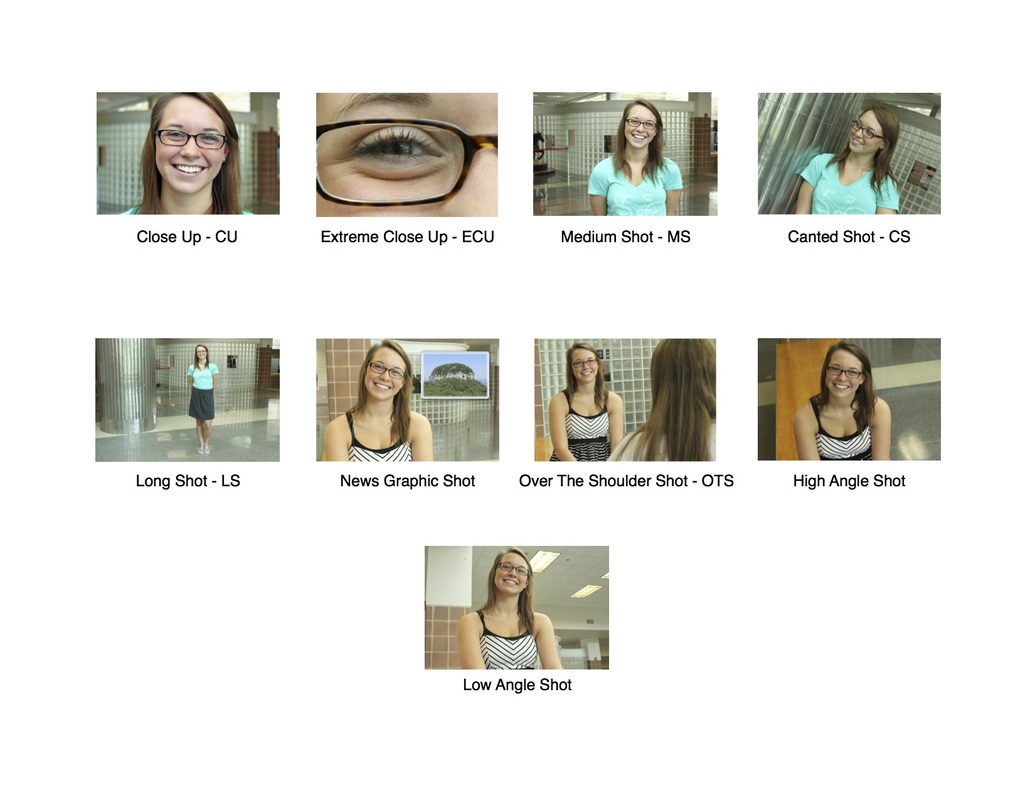
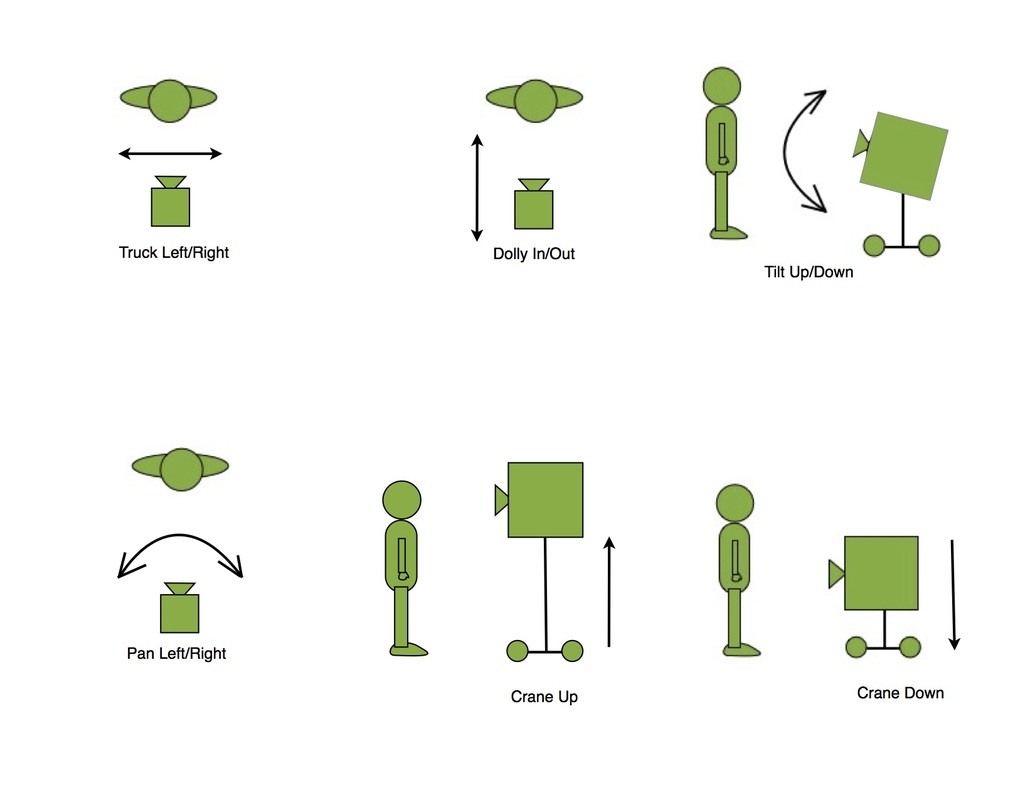
Camera Techniques Project:
A quick way to tell if a video production is of professional quality or done by an amateur is the use of proper shot composition and camera movement techniques. In this project, you will learn about each type of shot and get practice collecting each one. You will be using your iPhones or other various Smart phones and will be pairing up with one of your other classmates.
Review both the Camera Composition and Camera Movement pictures at the bottom of this page and find a partner. Using your cameras on your phones, collect an example of each technique we learned in class. The shot compositions can be either a still image or a moving video. To demonstrate the Camera Movements, video will be needed. Create a New Project in Premiere Pro and import your photos and videos from the camera onto your classroom computer. Place one example of each shot in the video. For each shot, add a Text slide naming it before the shot is shown. Make sure your photo or video is edited to be usable in the video and that the frame size fills the screen.There should be no black border around anything. AKA: DON'T take video vertically and make sure you film horizontally every time. Finally, add a background song and a Title slide with you and your partner's names on it to make your video more interesting to the audience. After you have finished your project, save it as a Premiere Pro Project file with the last names of each group member + technique. Export the file as a Quick Time Movie (ex: scalesscalestechnique.mov). Submit the exported video to the DropItToMe link on the front of our website. Don't forget to review the rubric to make sure you are meeting all of the project requirements. |
LOOK AND READ THESE BEFORE YOUR BEGIN:
AFTER YOU"VE READ THE ABOVE DOCUMENTS, YOU MAY START WITH EVERYTHING BELOW:
| ||||||||||
Adobe Premiere Color Correction Tutorial:
Choose a video clip that you have currently downloaded on your computer (Birthday 500 or Camera Techniques) and follow along with the video tutorials to give the desired effects. Keep in mind that you won't have the exact same output/data that the videos have since, you know you don't have the same video used.
Digital Video Final Project:
In this project you will work in groups of 3-6 and create a short film (5 Minute Minimum) to show the cumulative knowledge you've gained of Filmmaking and Adobe Premiere. You must create and turn in an Ideation Log and Script prior to shooting any footage and get the topic of the film approved by Mr. Goble. Due to the extensive and group nature of the project, each day the video is late your grade will drop by 10 points. Films that fall under the 5 minute time period will be assessed accordingly. (Example: Every 5 seconds = 1 point deduction) *You will NOT be graded on the quality of your acting, but rather the quality of your finished project.